
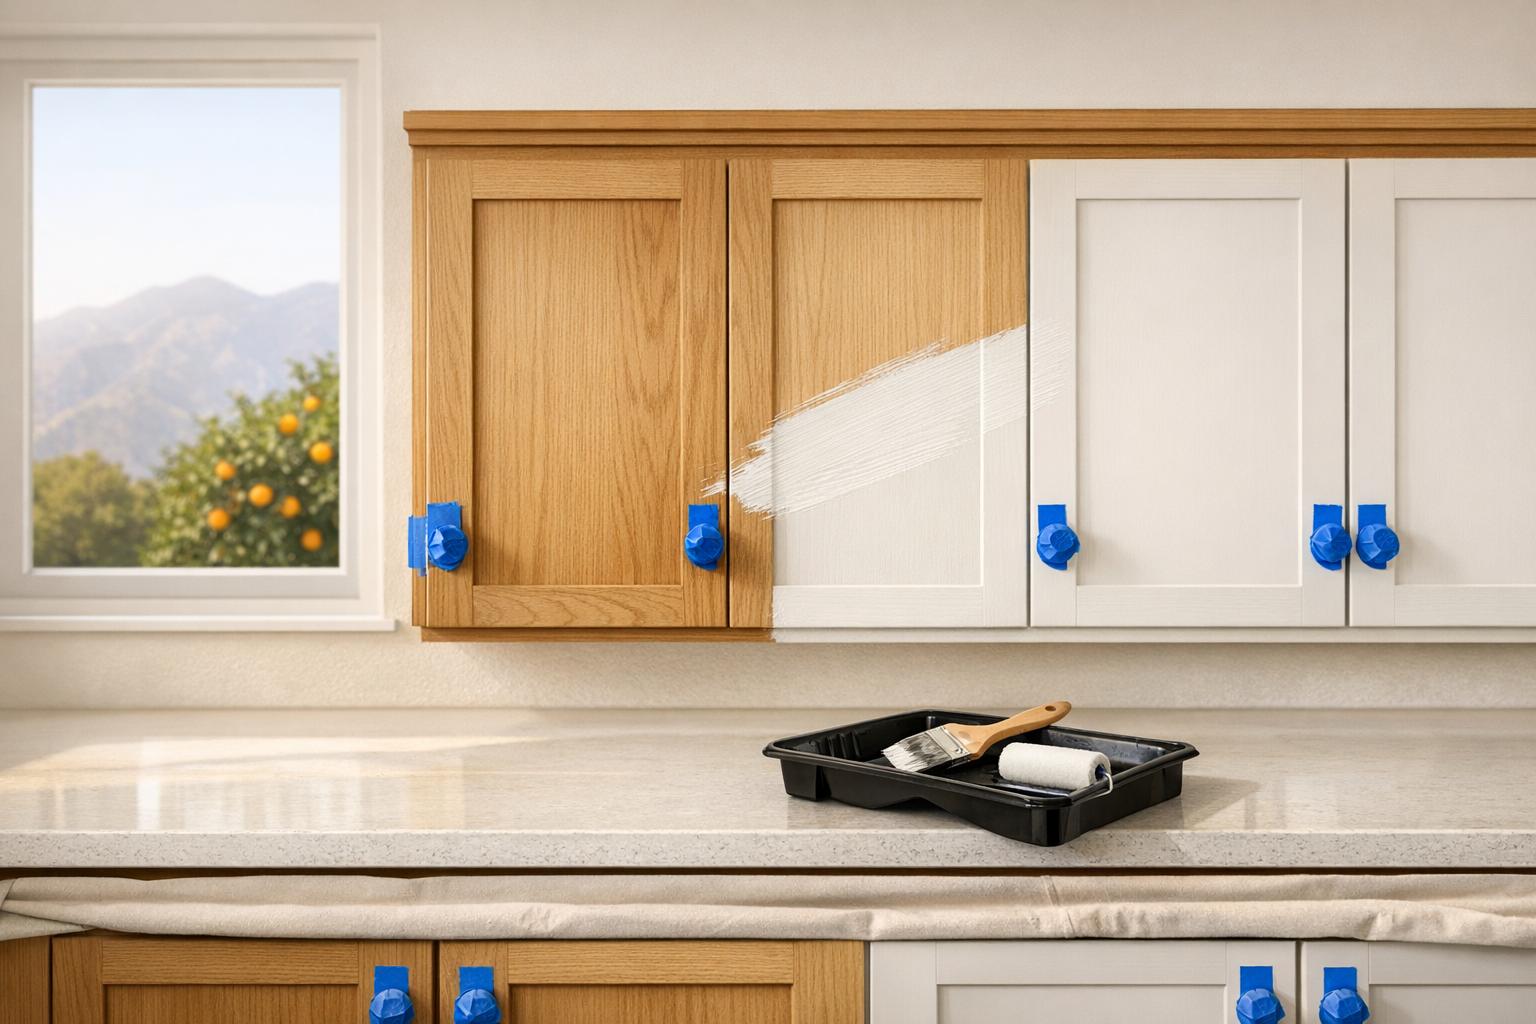
Cabinet Painting in Sierra Madre: Transform Your Kitchen for Less
Want a new kitchen look without spending a fortune? Cabinet painting is the answer. It’s a cost-effective way to update your kitchen while keeping your existing cabinets. In Sierra Madre, where homes often feature sturdy but older cabinets, painting can modernize the space for a fraction of the cost of a full remodel.
- Cost: Cabinet painting costs $1,500–$7,000 vs. $10,000–$30,000 for replacements.
- Time: Professionals complete the job in 3–7 days, keeping your kitchen functional.
- Durability: A high-quality paint job lasts 8–15 years with proper care.
This guide covers why cabinet painting works well for Sierra Madre homes, how to choose the right materials, and whether to DIY or hire professionals. Learn how to refresh your kitchen quickly and affordably while ensuring a polished, long-lasting finish.
Kitchen Cabinet Painting Start to Finish | Full DIY Process, Tools, Cost & Tips
sbb-itb-b9ba8eb
Why Cabinet Painting Works Well for Sierra Madre Homes
Sierra Madre is known for its charming mix of historic Craftsman bungalows, mid-century homes, and kitchens with older layouts. These homes often feature sturdy, well-constructed cabinets that, while functional, can look outdated. Cabinet painting offers a way to keep the solid framework while completely refreshing the kitchen's appearance.
A Cost-Effective Kitchen Upgrade
A full kitchen remodel in Sierra Madre typically costs between $28,000 and $30,000. In contrast, cabinet painting ranges from just $1,000 to $4,000. By skipping demolition, disposal, and installation costs, homeowners can allocate those savings toward other design updates that modernize their kitchen without breaking the bank.
Modernizing Older Kitchen Styles
Many Sierra Madre kitchens, though practical, often feel stuck in the past with heavy oak finishes or dark-stained wood. Repainting cabinets in shades like warm white, soft greige, or deep navy can breathe new life into the space without requiring structural changes or appliance replacements. On top of that, cabinet painting can deliver an impressive return on investment of 200–300%, compared to the 50–60% ROI typical of a full remodel. Beyond choosing the right color, selecting a durable finish is crucial for ensuring the cabinets look great for years to come.
Selecting Finishes That Suit Sierra Madre's Climate
Given Sierra Madre’s warm summers and seasonal temperature shifts, wood cabinets are prone to expanding and contracting. Using the right primer and paint helps prevent cracking and peeling.
"The combination of warm summers and occasional temperature fluctuations in Pasadena neighborhoods means cabinet surfaces expand and contract throughout the year, making proper surface preparation and primer selection essential for finish durability." - Painting Contractors Pasadena
For kitchens, satin or semi-gloss finishes are the best options. They stand up well to steam, grease, and frequent cleaning, unlike flat finishes. High-quality products like Sherwin-Williams Emerald Urethane are designed for these exact conditions. With proper preparation, a professional paint job in Sierra Madre’s climate can last 8 to 10 years.
Choosing the Right Cabinet Materials for Painting
The material of your cabinets plays a big role in how well the paint job turns out. It affects how you prepare the surface, the type of primer you need, and how long the finish will last. Picking the right materials and prepping them properly can make your kitchen look fresh and vibrant for years. Knowing the characteristics of different materials helps you figure out the best approach for a durable finish.
Which Cabinet Materials Paint Best
Solid wood is by far the easiest material to paint. Its porous surface allows primer to bond well, resulting in a finish that’s both durable and long-lasting. However, open-grain woods like oak may need a grain filler to smooth out the texture before painting.
MDF (medium-density fiberboard) is another great option. It provides a smooth surface for painting, but its edges can absorb moisture and swell if they’re not sealed correctly before you start.
Laminate and thermofoil, on the other hand, are trickier to work with. These materials have non-porous surfaces, so you’ll need a specialized bonding primer to make the paint stick. As Eugene Chernioglo of America’s Advantage Remodeling notes:
"Understanding the type of cabinet you have is key... solid wood or medium-density fiberboard (MDF) are excellent for a durable finish."
Here’s a quick comparison of how these materials perform when painted:
| Material | Ease of Painting | Key Challenge |
|---|---|---|
| Solid Wood | High | Grain texture may show through |
| MDF | High | Edges can swell if not sealed |
| Laminate | Low | Poor adhesion; prone to peeling |
| Thermofoil | Low | Sensitive to heat; peeling edges |
These differences highlight why proper preparation is so important for achieving a professional-looking result.
How to Prep Different Cabinet Surfaces
Careful preparation is the backbone of a successful paint job. As Brian Shaffer, owner of Cabinet Painting Co., explains:
"The secret isn't just in the paint - it's in the prep. Great paint on a poorly prepared surface chips, peels, and telegraphs every flaw."
Start by thoroughly cleaning the cabinets with a heavy-duty degreaser like TSP (trisodium phosphate) or Krud Kutter. Even if grease isn’t visible, it can prevent the paint from adhering properly.
For solid wood, scuff-sand the surface with 120–150 grit sandpaper to create a texture the primer can grip. After priming, sand between coats with 220 grit for a smoother finish. If the wood is prone to tannin bleed, use an oil-based or stain-blocking primer.
When working with MDF, apply a high-build primer and make sure to seal the edges completely to avoid swelling.
Laminate and thermofoil need extra attention. Use a shellac-based bonding primer, such as Zinsser BIN or Sherwin-Williams Extreme Bond, to ensure proper adhesion. For thermofoil cabinets, inspect for peeling edges before painting. If the coating is lifting, the paint won’t hold in those areas.
Finally, if your home was built before 1978, test for lead paint before sanding to ensure safety.
Picking the Right Paints, Primers, and Finishes
Choosing the right products is crucial for achieving a durable and attractive finish on your cabinets. Remember, cabinets endure far more wear and tear than walls, so not all paints are up to the task.
Key Products for Cabinet Painting
Skip standard latex wall paint when it comes to cabinets. Wall paint often stays too soft and can feel sticky on cabinet doors because it lacks the resins needed to resist grease and frequent handling. Instead, look for cabinet-grade enamel.
By 2026, acrylic-alkyd hybrid paints - also known as urethane alkyd enamels - have become a favorite among DIYers and professionals alike. These paints offer the durability and smooth finish of traditional oil-based options but with the added benefits of low odor and water-based cleanup. Haroon Hassan, Lead DIY Expert at Home Tool Creatives, highlights their popularity:
"Urethane Alkyd Enamel is the current gold standard for DIYers in 2026. It's tough as nails once it cures and doesn't yellow over time."
Professionals in areas like Sierra Madre and San Gabriel Valley often turn to products such as Sherwin-Williams Emerald Urethane Trim Enamel and Benjamin Moore Advance. These paints are praised for their self-leveling properties, which help eliminate brush marks and create a near-factory finish.
Equally important is the primer you choose. For glossy or slick surfaces, bonding primers like INSL-X Stix or Sherwin-Williams Extreme Bond ensure proper adhesion and reduce the risk of peeling. If you're working with raw or bare wood that has heavy tannins, a shellac-based stain-blocker like Zinsser BIN is your best bet to prevent discoloration. Once primed, the next step is selecting the right finish to balance durability with the look you want.
Comparing Finish Options for Kitchen Cabinets
The finish you choose can make a big difference in both appearance and functionality. Satin and semi-gloss finishes are particularly popular because they resist moisture and are easy to clean.
| Finish | Sheen Level | Ease of Cleaning | Best For |
|---|---|---|---|
| Satin | 25–35% | Moderate | Modern kitchens; hides minor surface flaws |
| Semi-Gloss | 35–50% | Easy | High-traffic family kitchens; most popular choice |
| High-Gloss | 50%+ | Very Easy | Contemporary, high-end remodels; reveals flaws |
| Flat/Matte | Under 10% | Difficult | Not recommended for cabinets |
For most kitchens, semi-gloss is the go-to choice. Its ease of cleaning and moisture resistance make it ideal for high-traffic areas. If you prefer a softer, less reflective look, satin is a great alternative, especially in kitchens that don't deal with heavy grease. A growing trend is to mix finishes - using semi-gloss on lower cabinets for durability and satin on upper cabinets for a more subtle, two-tone effect.
Finally, keep in mind that cabinet-grade paint may dry quickly but takes 2–4 weeks to fully cure. During this time, handle the doors with care to avoid dents or marks on your freshly painted surfaces.
How to Paint Kitchen Cabinets: A Step-by-Step Guide
Painting kitchen cabinets is all about taking your time and doing things right. As Bilal Hassan, Founder of Dwellify Home, says:
"The secret isn't fancy paint. It's the prep and patience between coats."
If you're ready to tackle this project, here's a detailed guide to help you get it done.
Getting Your Cabinets Ready
Start by removing all cabinet doors, drawer fronts, and hardware. Label each door with painter's tape (e.g., "Upper 1" or "Lower 3") and write the same label inside the corresponding cabinet. Snap a few photos before you take everything apart - this will make reassembly much easier.
Next, clean every surface thoroughly. This step is critical. Haroon Hassan, a DIY expert at Home Tool Creatives, explains:
"If you don't remove that grease, your paint is essentially sitting on a layer of invisible butter. It will never bond."
Use TSP (trisodium phosphate) or a strong degreaser to scrub the cabinets, focusing on areas near handles and the stove. Clean everything twice - once for general dirt and again for grease-heavy spots. Fill any dents or scratches with wood filler, slightly overfilling to allow for shrinkage. Once dry, sand the filler smooth with 220-grit sandpaper. If your home was built before 1978, test for lead paint before sanding to ensure safety.
The Painting Process
After cleaning and repairs, lightly sand all surfaces with 120- to 150-grit sandpaper. This creates a texture that helps the primer stick. Vacuum thoroughly and use a tack cloth to remove any remaining dust. Skipping this step can leave you with a bumpy finish.
Apply two thin coats of bonding primer instead of a single heavy coat. Once the primer dries, sand it lightly with 220-grit sandpaper and wipe it clean before moving on to the paint. For painting, use a 2-inch angled brush for corners and edges, and follow immediately with a 4-inch high-density foam roller on flat areas to smooth out brush marks. Apply 2–3 thin coats of paint, sanding lightly between coats to ensure a smooth and even finish.
Curing and Final Touches
After the final coat of paint, let the doors cure for 48–72 hours before reattaching them. Reinstalling too soon can cause "blocking", where the doors stick to the cabinet frames and damage the paint. Avoid using any cleaners on the surfaces for at least a week.
Once the hardware is reinstalled, place clear silicone bumper dots on each corner of the doors. These protect the fresh paint from slamming against the cabinet frames during the curing process, which can take 2–4 weeks to fully harden. Before calling it done, check for any thin spots or areas that might need a quick touch-up.
| Day | Task |
|---|---|
| Day 1 | Remove doors, label pieces, and deep-clean with TSP |
| Day 2 | Sand surfaces, clean off dust, and apply the first primer coat |
| Day 3 | Lightly sand and apply the first coat of paint |
| Day 4 | Lightly sand and apply the second (final) coat of paint |
| Days 5–7 | Allow the paint to cure; keep doors off before reassembly |
Professional Cabinet Painting vs. DIY: Which Option Fits You?
DIY vs. Professional Cabinet Painting: Cost, Time & Quality Compared
Now that the painting process has been explained, it’s time to weigh your options: tackle the project yourself or hire a professional. Both choices can work, but the outcomes and the experience differ significantly.
Time and Labor: DIY vs. Professional
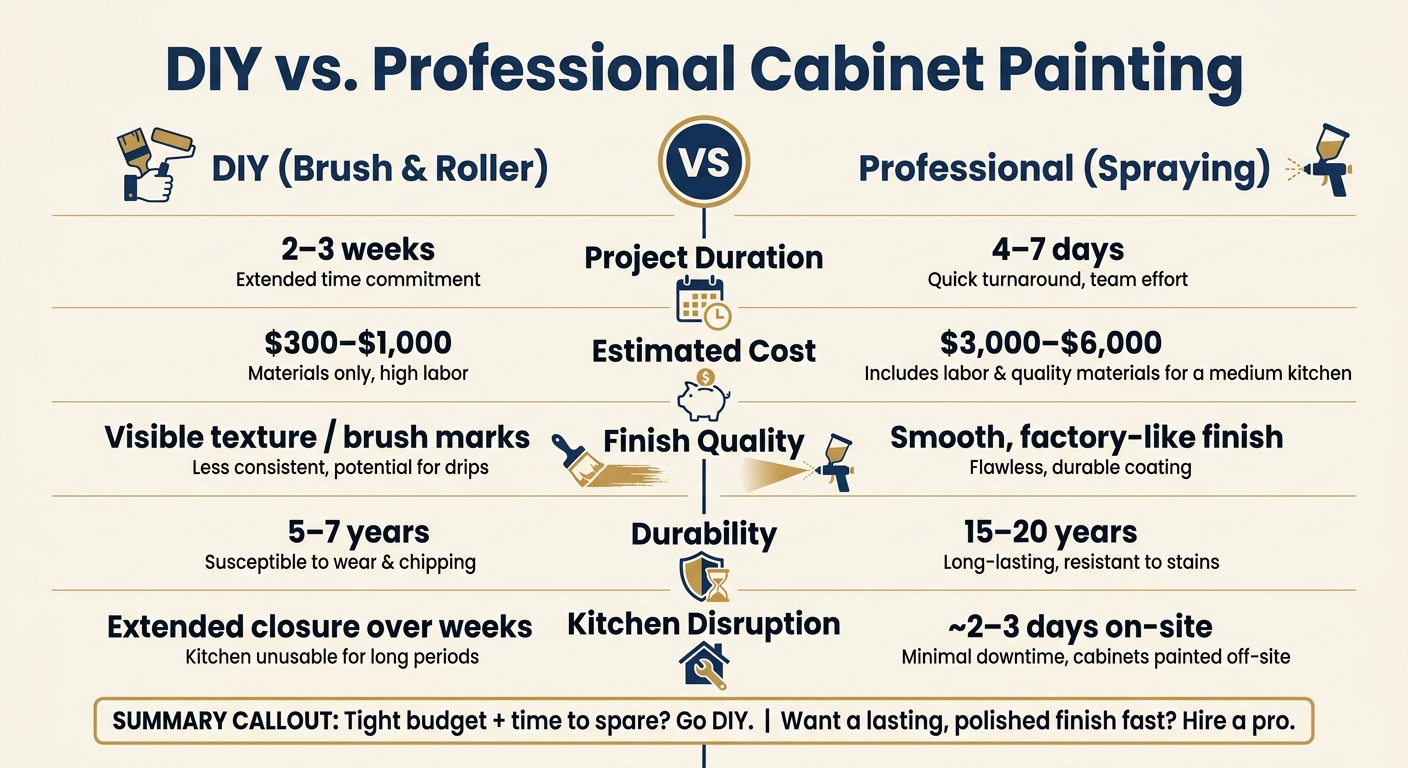
Taking on a cabinet painting project yourself for a medium-sized kitchen typically means dedicating 2 to 3 weeks of active work, often spread across weekends. During this time, your kitchen will likely be out of commission. On the other hand, a professional crew can complete the same job in just 4 to 7 days, with only about 2 to 3 days of on-site work. Prep work - like removing doors and applying multiple coats - takes considerable effort, regardless of who does the job.
Costs and Equipment: What to Expect
DIY costs for materials such as paint, primer, sandpaper, rollers, and brushes can range from $300 to $1,000, depending on the size of your kitchen and the quality of the products. While this option might seem budget-friendly, it requires a significant investment of your time and energy.
For professional cabinet painting in Sierra Madre, the cost typically runs between $100 to $175 per door or drawer opening. For a medium kitchen with about 30 openings, this translates to a total cost of approximately $3,000 to $6,000. While the price difference is noticeable, the labor and materials used by professionals often result in a longer-lasting and more polished finish.
Timothy Dale, a Home Repair Expert at The Spruce, highlights the benefits of professional work:
"Professionally painted kitchen cabinets can increase the life expectancy of the cabinetry by eight to 10 years, depending on the current condition."
Getting a Clean, Even Finish
One of the biggest factors to consider is the quality of the finish. DIY projects, even with high-quality brushes and rollers, can leave subtle imperfections like brush marks or an "orange peel" texture. In contrast, professionals use advanced tools like HVLP (High Volume Low Pressure) spray equipment, often in controlled, off-site spray booths. This setup allows them to achieve a smooth, glass-like finish. They also use durable industrial-grade coatings such as 2K polyurethanes or conversion varnishes, which can last 15 to 20 years, compared to the 5 to 7 years you might get with a DIY job.
As Oscar Rojas, Owner of Rojas Painting, explains:
"Painting cabinets is not the same as painting a wall. It is a completely different process that requires different products, different tools, and a different skill set."
Whether you choose to go the DIY route or hire a pro, the ultimate goal is to create a durable, smooth finish that transforms your kitchen.
| Feature | DIY (Brush & Roller) | Professional (Spraying) |
|---|---|---|
| Project Duration | 2–3 weeks | 4–7 days |
| Estimated Cost | $300–$1,000 | $3,000–$6,000 (medium kitchen) |
| Finish Quality | Visible texture/brush marks | Smooth, factory-like finish |
| Durability | 5–7 years | 15–20 years |
| Kitchen Disruption | Extended closure over weeks | Approximately 2–3 days on-site |
If you have the time and are working within a tight budget, a DIY approach can work. But if you’re looking for a long-lasting, professional-grade finish with minimal disruption, hiring experts - like the team at Huff Painting Co. - is a worthwhile investment.
How to Keep Your Painted Cabinets Looking Good
A fresh coat of paint can transform your cabinets, but maintaining that polished look requires a little ongoing care. Luckily, keeping them in great shape doesn’t take much - just a few simple habits to protect the finish.
Day-to-Day Cleaning and Care
The best way to clean painted cabinets is with a soft microfiber cloth and a mix of mild dish soap diluted in warm water. Microfiber is gentle yet effective, trapping dirt and grease without scratching the surface. This is important because over 75% of common household cleaners contain ammonia or abrasives that can damage a cabinet’s topcoat in under 60 seconds.
Avoid harsh cleaning tools like Magic Erasers, steel wool, or even paper towels. These can act like sandpaper, dulling the finish permanently. For stubborn grease near stoves, try a diluted vinegar solution (1 part vinegar to 2–3 parts water) or a water-based degreaser like Krud Kutter. Always test cleaners on a hidden area first to avoid surprises.
After cleaning, dry the surface immediately. Standing water, especially around seams near the sink, is a major culprit behind bubbling and peeling paint. In fact, 68% of cabinet damage starts at the sink base due to water dripping down the door face. Another tip: use knobs and pulls instead of touching painted edges. Skin oils can wear down the finish, which explains why 92% of finish failures occur on high-contact areas like door edges.
"If you use the wrong chemicals, you aren't just cleaning; you are dissolving the very finish you paid to protect." - Painting Kitchen Cabinets Denver
Fixing Chips and Worn Spots
Small chips and nicks are inevitable, but they’re easy to repair if caught early. Keep a small container of your original paint and a fine artist’s brush handy. When a chip appears, clean the area with a mild degreaser, lightly sand with 220–320 grit sandpaper, and apply thin layers of paint, feathering the edges for a smooth finish. Once the paint is dry, seal the repair with a clear polycrylic or polyurethane topcoat to protect it from future damage. Addressing chips promptly prevents water from seeping under the paint, which can lead to much bigger issues.
Long-Term Habits That Protect the Finish
A few upgrades and habits can go a long way in preserving your cabinets. Soft-close hinges, which cost about $3 to $8 each, can reduce impact damage by up to 50% compared to standard hardware. Additionally, a simple hygrometer (around $10) can help you maintain indoor humidity between 35% and 55%, preventing wood from expanding and contracting enough to crack the paint.
Be mindful of your kitchen setup. Keep small appliances like toasters and coffee makers at least 4 inches away from cabinet surfaces, and always use your range hood when cooking to limit steam buildup. Avoid hanging damp dish towels over cabinet doors, as consistent moisture can cause the paint to bubble or peel within a year. For light-colored cabinets, UV-filtering window film can help prevent yellowing over time.
"Prevention is less expensive than repair and far more rewarding in the rooms where life happens most." - Michael Hartel, Cabinet IQ
With the right care, professionally painted cabinets can last 8 to 10 years or more. A touch-up every 3 to 5 years keeps them looking fresh, even in high-traffic kitchens.
Conclusion: Refresh Your Kitchen with Huff Painting Co.
Giving your kitchen a fresh look doesn’t have to break the bank. Cabinet painting is an affordable way to update your space, often saving you up to 70% compared to replacement costs. Even better, it’s a quick process - most projects are completed in just 2 to 5 days - while offering nearly a full return on your investment.
Using top-tier paints, specialized primers, and careful preparation, Huff Painting Co. delivers a finish that’s built to last and looks as good as factory-made. For those prioritizing health, low-VOC and zero-VOC paint options are available, ensuring a safer environment for your family.
With over 40 years of experience serving Sierra Madre and the San Gabriel Valley, Huff Painting Co. is a trusted, family-owned business. Fully licensed (CA License #451832), bonded, and insured, the company also provides a complimentary professional color consultation to help you create the perfect look for your kitchen.
Getting started is easy. Contact Huff Painting Co. for a free estimate - whether online, by phone, or via email at coryhuff40@yahoo.com. They’ll provide a clear, detailed quote and guide you through the process of transforming your kitchen into a space you’ll love.
FAQs
Will cabinet paint hold up in Sierra Madre’s heat and temperature swings?
Yes, your cabinet paint will hold up over time. Huff Painting Co. relies on premium products from Sherwin-Williams and Dunn-Edwards, specifically selected for their durability in Southern California’s climate. They use specialized primers and paints to create a finish that looks factory-applied and lasts. Since cabinet painting is done indoors, the finishes are protected from harsh outdoor elements like temperature fluctuations and UV rays, helping them maintain their appearance and quality for years to come.
Do I need to remove the doors, or can cabinets be painted in place?
With Huff Painting Co., you can forget about the hassle of removing cabinet doors. Our team takes care of every step, from masking and protecting nearby fixtures to applying high-quality primers and paints. We deliver a smooth, durable, factory-like finish while keeping your kitchen fully functional. No need for disassembly or prep on your part - just leave it to us for a seamless, professional result.
How soon can I use my kitchen normally after cabinet painting?
After your cabinets are painted, you can usually start using your kitchen again within just a few days. Even though the paint might feel dry to the touch, it actually takes about 2–4 weeks to fully cure. During this curing period, it’s best to avoid heavy use, scrubbing, or washing the cabinets to prevent any potential damage or smudging. Light use is okay, but be gentle with the surfaces until the paint has completely set.