
Smoke Damage Painting After the Eaton Fire: What Homeowners Need to Know
The Eaton Fire, which occurred in January 2025, caused extensive damage, affecting over 23,000 residents and leaving thousands of homes with severe smoke and soot damage. Restoring these homes requires careful cleaning, preparation, and repainting to address discoloration, odors, and toxic residues like lead and asbestos. Here’s what you need to know:
- Identify Smoke Damage: Look for discoloration, blistering paint, or lingering odors. Check hidden areas like vents or corners.
- Clean Surfaces: Use dry-cleaning sponges for loose soot and wet cleaning solutions like trisodium phosphate for sticky residues. Avoid spreading contaminants.
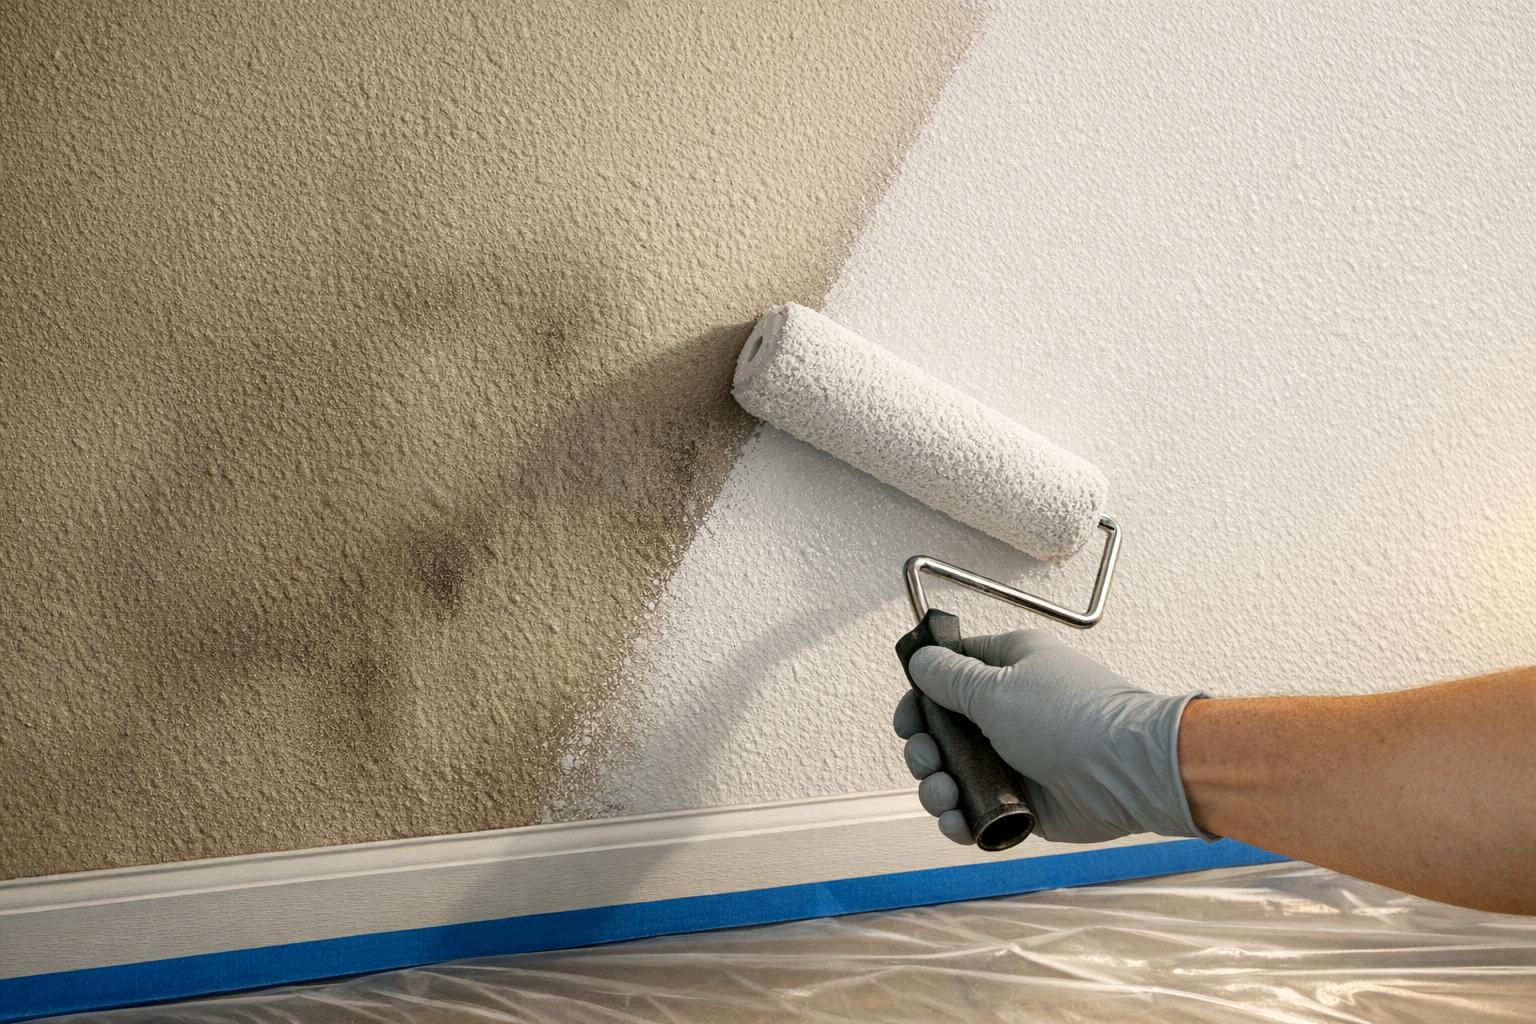
- Prepare for Repainting: Repair damaged areas, ensure surfaces are dry, and apply odor-blocking primers (e.g., shellac-based products) to seal in stains and odors.
- Choose the Right Paint: Use high-quality paints designed for durability and stain resistance. Apply two coats for the best results.
- When to Call Professionals: Persistent odors, structural damage, or failed DIY attempts may require expert help. Professionals can also assist with insurance claims and ensure proper restoration.
Act quickly to prevent long-term issues like mold or corrosion. For severe cases, consider professional services to ensure safety and effectiveness.
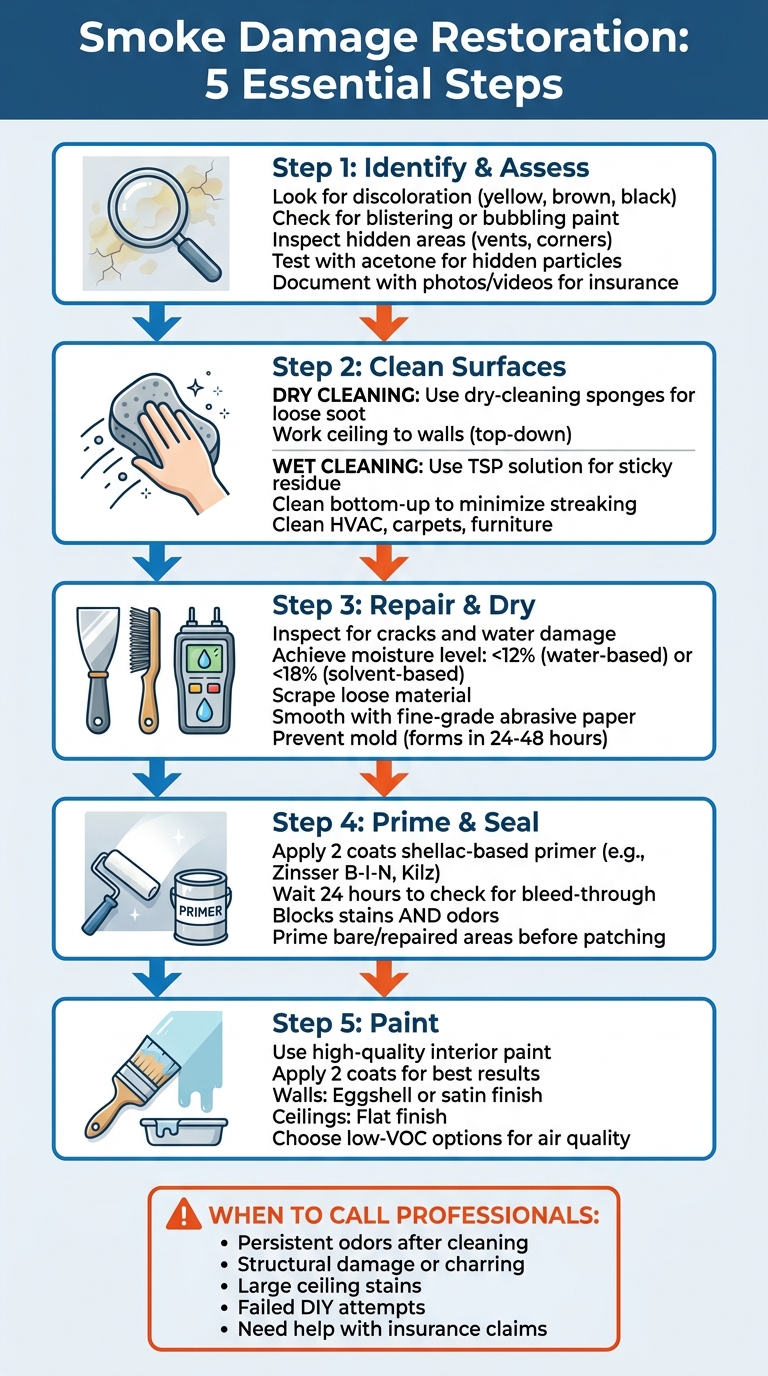
5-Step Smoke Damage Restoration Process for Homeowners
How to Identify and Assess Smoke Damage
Signs of Smoke Damage on Painted Surfaces
Smoke damage often leaves visible traces on walls and ceilings. Look for discoloration in shades of yellow, brown, or black, as well as signs like blistering or bubbling paint, which suggest that heat and smoke have penetrated beneath the surface.
The type of residue can reveal the source of the smoke:
- Dry smoke: From fast-burning materials like wood or paper, it leaves a powdery residue that’s easy to vacuum but can settle deep into cracks.
- Wet smoke: From burning plastics or rubber, it creates a thick, sticky residue that smears when touched.
- Protein smoke: From evaporated organic matter, it’s nearly invisible but causes discoloration on paint and varnish while leaving a strong, lingering odor.
"The general rule is that if you can see it, there is a fair amount of soot, nicotine, or tar on the surface." - A Touch of Color Painting & General Contracting
Don’t forget to check hidden areas like corners, behind furniture, and HVAC vents. Smoke can travel through air circulation systems and settle in places flames never reached. If you suspect smoke damage but don’t see residue, try an acetone test - this can reveal hidden particles.
Persistent odors are another major clue. A smoky or burnt plastic smell suggests smoke particles and volatile organic compounds (VOCs) have embedded themselves in porous materials, even if no soot is visible. Interestingly, about 33.9% of restoration projects involve smoke damage without any significant fire damage.
After identifying these signs, it’s essential to take safety precautions during your assessment.
Safety Precautions During Assessment
Before entering the property, ensure it’s been officially cleared as safe. Address any electrical or ventilation issues before proceeding.
Always wear proper personal protective equipment (PPE):
- An N95 or HEPA mask (or respirator)
- Gloves
- Safety glasses
- Boots
- A hard hat
Smoke contains harmful chemicals and fine particles, so respiratory protection is particularly important.
"The volatile organic compounds and fire debris deposited on objects is toxic and requires appropriate health and safety measures, such as wearing a mask and gloves, while handling them." - Brook Prestowitz, Associate Conservator of Paper, Williamstown Art Conservation Center
Improve ventilation by opening windows and using fans, but make sure fans direct air away from contaminated surfaces to prevent spreading soot particles. Avoid touching smoke-damaged surfaces with bare hands, as body oils can push soot deeper into materials like drywall, making cleanup more difficult.
Once safety is addressed, documenting the damage is the next critical step.
How to Document Damage for Insurance Claims
When documenting smoke damage, revisit the signs you’ve already identified. Take high-resolution photos and videos of all affected areas, including discolored walls, soot residue, blistered paint, and any charred items.
For hidden damage, use the acetone test. Wipe a 4-square-foot area with a white cloth and acetone, then photograph any residue on the cloth as evidence.
Create an inventory of all damaged items in a dedicated file. If you’re in California and the damage is part of a declared disaster, state law requires insurers to provide a cash advance of at least 30% of your dwelling coverage limit and four months of Additional Living Expense (ALE) coverage upon request.
"Under California law, after an officially declared disaster, your insurer is required to give you an advance of no less than 30% of your 'dwelling' insurance limit and at least 4 months of your available coverage for temporary rent and other additional living expenses." - United Policyholders
Submit advance requests in writing, even via email, to create a record. Keep a "Home Loss File System" with all claim-related documents, including photos, receipts for temporary housing, and correspondence with adjusters. Professional assessments from restoration experts can also strengthen your claim by detailing odor, air quality issues, and structural soot damage. Avoid cleaning any surfaces before the adjuster’s inspection, as improper cleaning can spread residue and complicate the valuation of damages.
Comprehensive documentation is crucial for ensuring a smooth restoration process and proper reimbursement for repairs and restoration work.
sbb-itb-b9ba8eb
The Zinsser Bunch, Ep. 18: HOW TO FIX Fire & Smoke Damage Using Zinsser B.I.N
How to Clean Smoke-Damaged Surfaces
Cleaning smoke-damaged surfaces is a crucial step before repainting. The method you use depends on the type of soot - dry soot from high-oxygen fires requires a different approach than the oily residue left by low-oxygen fires. Start with dry cleaning to avoid smearing, and use wet cleaning only when necessary.
Dry Cleaning Methods for Soot Removal
Dry cleaning is the first line of defense for surfaces affected by dry soot from high-oxygen fires. Using water on this type of soot can cause permanent stains and push particles deeper into porous materials like drywall or wood. A dry-cleaning sponge (also called a chemical sponge) is ideal for lifting soot. Gently wipe in a downward motion, avoiding scrubbing or adding moisture, which could worsen the damage.
While cleaning, wear protective gear like gloves and masks. Ensure proper ventilation by opening windows and using fans, but turn off your HVAC system to prevent soot from spreading further. Protect floors with drop cloths or newspapers to catch falling debris.
Always clean from the ceiling down to the walls. This method prevents loose soot from settling on already cleaned areas. If using a HEPA-filter vacuum, hold the nozzle about half an inch from the surface to avoid smearing.
Wet Cleaning Techniques for Stubborn Residue
After removing loose soot, wet cleaning can tackle the oily residue left by low-oxygen fires. Create a cleaning solution by mixing warm water with a high-alkaline detergent like trisodium phosphate (TSP). If TSP isn't available, mild dish soap or white vinegar can also work. Before applying the solution widely, test it on a small, hidden area (about 4 square feet) to ensure it doesn’t damage the surface.
Clean from the bottom up using a soft sponge or cloth, which helps minimize streaking. Rinse the area with clean water and allow it to dry completely before starting repairs or repainting. These steps prepare the surface for a smooth and lasting finish.
Cleaning Beyond Walls and Ceilings
Soot doesn’t just affect walls and ceilings - it can settle into carpets, furniture, drapes, and clothing. If left unaddressed, these areas can continue to release odors and particles that may resettle on newly cleaned surfaces.
- Use a HEPA-filter vacuum to remove loose particles from furniture and other soft surfaces.
- Curtains, rugs, and upholstered furniture may require professional deep cleaning to fully eliminate soot and odors.
- Inspect your HVAC system, as smoke particles often accumulate in air ducts and filters. Cleaning the ducts and replacing filters can help improve air quality after restoration.
Don’t forget to check hidden areas like corners and vents. Address any damp spots immediately to prevent mold from developing, as mold can form within 24–48 hours.
How to Prepare Smoke-Affected Surfaces for Repainting
After removing soot, it's crucial to properly prepare the surfaces to ensure the new paint adheres well and lasts. This involves repairing any damage, thoroughly drying the surfaces, and sealing them to prevent lingering odors and stains from reappearing.
Repairing and Drying Damaged Areas
Start by inspecting all affected areas, including less obvious spots like vents and ducts, for signs of water damage, cracks in drywall, or discoloration. Soot is acidic and can corrode metal or weaken building materials if not promptly addressed.
Before making repairs, ensure the surfaces are completely dry. Use fans and dehumidifiers to achieve a moisture level below 12% for water-based methods or 18% for solvent-based ones. Scrape away any loose material, then use fine-grade abrasive paper to smooth out the area.
Once the repairs are done and the surfaces are dry, move on to cleaning and priming to get them ready for painting.
Surface Cleaning and Priming Steps
Begin by checking for hidden contamination using the acetone test. Clean intact paint with a universal cleaner and degreaser to remove any lingering contaminants, and rinse thoroughly. If you find mold or organic growth, treat the area with a mold killer before proceeding.
To seal stains and odors, apply two coats of a shellac-based primer. Allow 24 hours to pass to ensure no bleed-through occurs, then prime any bare or repaired areas before caulking or patching.
Surface Preparation Methods Compared
| Method | Effectiveness for Smoke Damage | Duration | Best Use Case |
|---|---|---|---|
| Dry Scraping/Sanding | High for physical debris | High | Removing loose soot and leveling damaged paint edges |
| Chemical Degreasing | High for oily residue | Medium | Eliminating invisible contaminants and soot films |
| Shellac-Based Priming | Superior for stains/odor | Low (fast dry) | Sealing severe soot stains and blocking strong odors |
| Water-Based Priming | Moderate | Medium | Handling light smoke damage or meeting low-odor needs |
For more severe smoke damage, consider professional deodorization methods like thermal fogging, HEPA air scrubbing, or ozone treatments, which tackle odors at the molecular level before repainting. Additionally, clean and sanitize your HVAC system and ducts, as smoke particles trapped there can re-contaminate freshly painted surfaces.
Choosing the Right Paints and Primers for Smoke Damage
Using the right products is key to effectively restoring surfaces affected by smoke damage. Smoke stains, being oil-based, can bleed through regular paint no matter how many coats are applied. To achieve a lasting finish, you need primers and paints specifically designed to seal in contaminants after proper surface preparation.
What to Look for in Smoke-Sealing Primers
A good smoke-sealing primer creates a durable barrier between the damaged surface and the final paint layer. Look for products labeled as both stain-blocking and odor-sealing. These primers don’t just cover smoke residue - they lock it in completely.
"Smoke stains and soot are oil based. Regular paint cannot block them, so the stains migrate through the new paint layer unless a stain blocking primer is used." - Randall's
Shellac-based primers are often considered the top choice for tackling smoke damage. Products like Zinsser B-I-N Primer and Kilz Primer are especially effective because they dry faster than traditional oil-based primers and provide excellent odor-blocking properties [9, 14, 16]. For severe fire or cigarette smoke damage, applying two coats of shellac primer is recommended. Afterward, wait 24 hours to check for any signs of bleed-through before moving on to painting [9, 10].
Additionally, the primer should be compatible with porous surfaces such as drywall, wood, and plaster, which tend to absorb smoke particles. For lighter smoke damage or when a low-odor option is preferred, water-based primers like Bulls Eye 1-2-3 Plus can be a good alternative. However, they may not be as effective for heavy soot.
How to Select the Right Paint Type
Once the priming is complete, opt for a high-quality interior paint to ensure strong coverage and durability. Applying two coats of finish paint is essential for the best results. Premium options like Sherwin-Williams Super Paint not only provide a durable finish but also help reduce VOCs and formaldehyde, contributing to better indoor air quality [9, 10].
For walls, choose an eggshell or satin finish. These finishes are great for hiding minor imperfections and are easy to clean. Ceilings, which often bear more smoke damage, benefit from a flat finish. Proper preparation is crucial to achieve an even and clean result on ceilings [10, 15].
Huff Painting Co. Expertise in Paint Selection
Huff Painting Co. brings over 40 years of experience in smoke damage restoration to homeowners in Sierra Madre and nearby areas. Their team specializes in selecting the best primers and paints to handle everything from light soot to extensive fire damage.
When to Hire Professional Painters
When DIY Efforts Aren't Enough
After you’ve cleaned and prepped the surfaces, deciding whether to repaint yourself or call in professionals becomes a key decision. Some smoke damage situations are simply too challenging for DIY methods. For instance, persistent odors that linger even after cleaning often mean smoke particles have deeply penetrated surfaces. In these cases, professional deodorization techniques like thermal fogging or ozone treatments are necessary. If you’ve already tried repainting and the stains or odors have returned, it’s a clear sign the surface wasn’t properly sealed and needs professional attention.
"Professional help is recommended when odors are strong or persistent, stains cover large areas, ceilings are affected, fire damage is visible, or previous paint attempts failed." - Randall's
Structural damage is another major indicator that it’s time to call in the pros. Issues like visible charring, heat blisters, or warped walls suggest that the material may need replacement rather than just a fresh coat of paint. Stains on large ceiling areas are particularly tricky to handle without professional-grade tools and primers. Additionally, soot contains harmful components, making professional-grade safety measures essential. Experts can also clean HVAC systems, which are often overlooked in DIY efforts but can harbor smoke contaminants.
If you’re facing lingering odors, structural issues, or widespread contamination, it’s a strong sign that professional help is necessary.
Benefits of Hiring Huff Painting Co.
When DIY solutions aren’t enough, hiring professionals offers a range of benefits. Smoke damage restoration is complex, involving embedded odors, potential structural concerns, and the need for advanced tools and techniques. Huff Painting Co. has over 40 years of experience helping homeowners in Sierra Madre and nearby areas restore their homes after smoke damage. Their services go beyond painting, including drywall repair, mold removal, and meticulous surface preparation using professional-grade equipment. This ensures that the damage is properly addressed, not just covered up.
Huff Painting Co. also assists with insurance claims, offering detailed damage reports and estimates to help you get the most out of your claim. They use specialized smoke-sealing primers and high-quality paints designed for fire-damaged surfaces, avoiding the costly mistakes that can result from DIY attempts. Acting quickly with professional help also prevents long-term problems like metal corrosion or discoloration, which could lead to expensive replacements down the line.
Perhaps most importantly, Huff Painting Co. prioritizes health and safety. Soot is acidic and can corrode surfaces if left untreated. Their team uses proper respiratory protection and containment measures to handle hazardous materials, ensuring your family’s safety throughout the process.
Conclusion
Restoring a home after smoke damage demands careful planning and execution. The process begins with a thorough assessment, followed by cleaning affected surfaces using the right techniques, and finishing with specialized products to seal in any leftover contaminants. Skipping any of these steps could leave behind persistent odors or allow stains to resurface.
The foundation of a successful restoration lies in proper surface preparation. Damaged areas must be repaired and dried completely before applying a smoke-sealing primer. This step is crucial because standard paint won't block the acidic residues left by soot, which can cause ongoing damage.
"Soot is acidic and can corrode metal, discolor walls, and deteriorate surfaces if not addressed promptly." - Allied Restoration
Time is of the essence - acting quickly can prevent secondary issues like mold, which can develop within 24–48 hours. Delaying restoration not only increases the risk of further damage to walls, ceilings, and fixtures but also drives up costs. Addressing soot damage promptly keeps these complications at bay.
For severe smoke damage, turning to experts like Huff Painting Co. can make all the difference. Their team ensures that no detail is overlooked, from tackling hidden contaminants in HVAC systems to eliminating odors at their source and sealing surfaces properly. With over 40 years of experience serving Sierra Madre and nearby communities, Huff Painting Co. provides comprehensive restoration services, ensuring your home is not just restored but also safe and welcoming once again.
FAQs
How do I know if smoke damage is still in my walls?
To spot lingering smoke damage in your walls, look for persistent odors, visible soot, or discoloration - these are strong indicators of contamination. Smoke particles often seep into porous materials like drywall, meaning the damage might not always be obvious to the eye or nose. If cleaning efforts fail to eliminate the odors or soot, it’s a good idea to bring in a professional to assess whether smoke damage is still present.
Will smoke stains or odors come back after repainting?
Smoke stains and odors tend to resurface if surfaces aren't cleaned thoroughly, sealed with a primer that blocks both stains and odors, or if lingering smoke particles aren't completely eliminated. To avoid these issues, it's crucial to clean all surfaces meticulously and use the right sealing products before repainting. This preparation step is key to achieving lasting results.
Can I stay in my home while smoke-damaged rooms are cleaned and painted?
If your home is undergoing cleaning and painting to address smoke damage, it’s best to avoid staying there during the process. These tasks involve intensive cleaning, sealing, and the use of specialized primers, which can release strong odors and chemicals into the air. Even with proper ventilation, lingering fumes may pose health risks. To ensure your safety and allow the restoration to be carried out effectively, consider temporarily vacating your home until the work is finished.